
I have an oil leak that seems to be coming from the crank front oil seal. Has anyone changed this with the engine in the car? Not much room to tap a new one in.
I notice there is a 'cover plate' bolted to the front. Can this be removed, fit oil seal on the bench and then bolt the 'cover plate' back on?
Front Crank Oil Seal
Moderator: Board Moderators
-
Tanz

- Senior Poster
- Posts: 2087
- Joined: Thu May 03, 2007 22:05
- Model: SE
- Colour: Calypso Red
- Year: 1988
- Location: Wolverhampton
Front Crank Oil Seal
Cheers, Phil
Never take life seriously, nobody gets out alive anyway!
Never take life seriously, nobody gets out alive anyway!
-
AndyC
- Senior Poster
- Posts: 2196
- Joined: Tue Nov 01, 2005 20:01
- Model: SE x2 + Celebration x2
- Colour: Gold,blue and green
- Year: 1987
- Location: Norwich
Re: Front Crank Oil Seal
I've not done one in place but can't think there's any reason why not. You would need to remove timing belt and pulley etc but those are generally OK in situ (but the crank sprocket can be a PITA in some cases.
-
Tanz
- Senior Poster
- Posts: 2087
- Joined: Thu May 03, 2007 22:05
- Model: SE
- Colour: Calypso Red
- Year: 1988
- Location: Wolverhampton
Re: Front Crank Oil Seal
I think I have answered my own question 

How important is the special tool and what is Wellseal
How important is the special tool and what is Wellseal
Cheers, Phil
Never take life seriously, nobody gets out alive anyway!
Never take life seriously, nobody gets out alive anyway!
-
Tanz
- Senior Poster
- Posts: 2087
- Joined: Thu May 03, 2007 22:05
- Model: SE
- Colour: Calypso Red
- Year: 1988
- Location: Wolverhampton
Re: Front Crank Oil Seal
Crank pulley is already removed
I also found when removing the crank pulley that round 'guide' that sits behind it was loose i.e. not pressed onto the back of the pulley and was causing the pulley to be pushed out slightly. This might explain why my cambelt always runs on the edge of the cams.
Below the pulley and its guide. The hole in the guide is bigger than the shaft and was on the shaft sandwiched by the pulley. It should have been pressed onto the back of the pulley as in the second picture. Sorry its not as sharp as it should be.
Cheers, Phil
Never take life seriously, nobody gets out alive anyway!
Never take life seriously, nobody gets out alive anyway!
-
Pete Boole
- Senior Poster
- Posts: 3728
- Joined: Tue Apr 04, 2006 21:28
- Model: Elite
- Colour: Monaco White
- Year: 1974
- Location: Nottingham
Re: Front Crank Oil Seal
Wellseal is a gasket goo (developed by Rolls Royce I think). The tool basically stretches the seal to allow it to go over the snout of the crank and centralise it, but some seals won't let the tool fit in because of how they are made. The chamfer on the crank really means that you can get away without it if you're careful ( be extra careful near the woodruff key) but because it is only the seal itself that centralises the casting (no locating dowels) it is important to allow it to settle before tightening the screws - be careful not to knock the casting off-centre while tightening or it will leak. I think I made a version of this tool some years ago - I'll have a look in my home-made tools bin!
Pete
Pete
-
Pete Boole
- Senior Poster
- Posts: 3728
- Joined: Tue Apr 04, 2006 21:28
- Model: Elite
- Colour: Monaco White
- Year: 1974
- Location: Nottingham
Re: Front Crank Oil Seal
Yes - the "thrust washer" is a loose fit onto the back of the pulley - easy to get it trapped.
Pete
Pete
-
Tanz
- Senior Poster
- Posts: 2087
- Joined: Thu May 03, 2007 22:05
- Model: SE
- Colour: Calypso Red
- Year: 1988
- Location: Wolverhampton
Re: Front Crank Oil Seal
Thanks for the replies. All this started with a sheared bolt on the auxiliary pulley but one job keeps leading to another one!
Cheers, Phil
Never take life seriously, nobody gets out alive anyway!
Never take life seriously, nobody gets out alive anyway!
-
DavidOliver

- Senior Poster
- Posts: 694
- Joined: Fri Nov 07, 2014 11:18
- Model: Excel
- Colour: Calypso Red
- Year: 1985
- Location: Malaga Spain
Re: Front Crank Oil Seal
With the new seal fitted to the housing, I suggest you remove the Woodruf key before fitting the housing to the block, simply taking care (and lubricating oil) to fit over the crank shamfer. Once located loosely fit three bolts and rotate the housing to centralise the seal over the crank and little by little tighten up the three bolts, then fit the remaining bolts and tighten up. You can be generous with Wellseal to facilitate centralising.
When you remove the Woodruf key you will probably damage it so get a new one before you do the job.
The timing belt buffer/washer is a loose fit to the crank belt sprocket (also worth replacing if any wear on the old one, despite the cost) so you can pre assemble to the sprocket with some silicone droplets to hold in place. When installing the sprocket it is important to make sure the buffer is located centrally, it is possible for it to drop off centre and displace the sprocket forwards.
Dave the cog.
-
DavidOliver
- Senior Poster
- Posts: 694
- Joined: Fri Nov 07, 2014 11:18
- Model: Excel
- Colour: Calypso Red
- Year: 1985
- Location: Malaga Spain
Re: Front Crank Oil Seal
A tip for refitting the Woodruf key. It can be difficult to fit the sprocket over the key, so when fitting you can slightly angle down the leading edge to enable initial contact and the sprocket will bed the key in as it is fully located along the crank.
Dave the cog.
Dave the cog.
-
Tanz
- Senior Poster
- Posts: 2087
- Joined: Thu May 03, 2007 22:05
- Model: SE
- Colour: Calypso Red
- Year: 1988
- Location: Wolverhampton
Re: Front Crank Oil Seal
Some great advice - thanks Dave.
I'm not sure about removing the Woodruf key. They usually have to be tapped out and it's difficult to get at down there plus when I removed the cover plate the seal didn't even touch the key. The internal diameter is 50mm and clears the small part of the shaft where the key is comfortably. I have a new seal and gasket coming from Lotusbits tomorrow so will see what a new seal looks like. Your method of centralising the seal looks good to me so will use that for sure.


I'm not sure about removing the Woodruf key. They usually have to be tapped out and it's difficult to get at down there plus when I removed the cover plate the seal didn't even touch the key. The internal diameter is 50mm and clears the small part of the shaft where the key is comfortably. I have a new seal and gasket coming from Lotusbits tomorrow so will see what a new seal looks like. Your method of centralising the seal looks good to me so will use that for sure.
Cheers, Phil
Never take life seriously, nobody gets out alive anyway!
Never take life seriously, nobody gets out alive anyway!
-
Tanz
- Senior Poster
- Posts: 2087
- Joined: Thu May 03, 2007 22:05
- Model: SE
- Colour: Calypso Red
- Year: 1988
- Location: Wolverhampton
Re: Front Crank Oil Seal
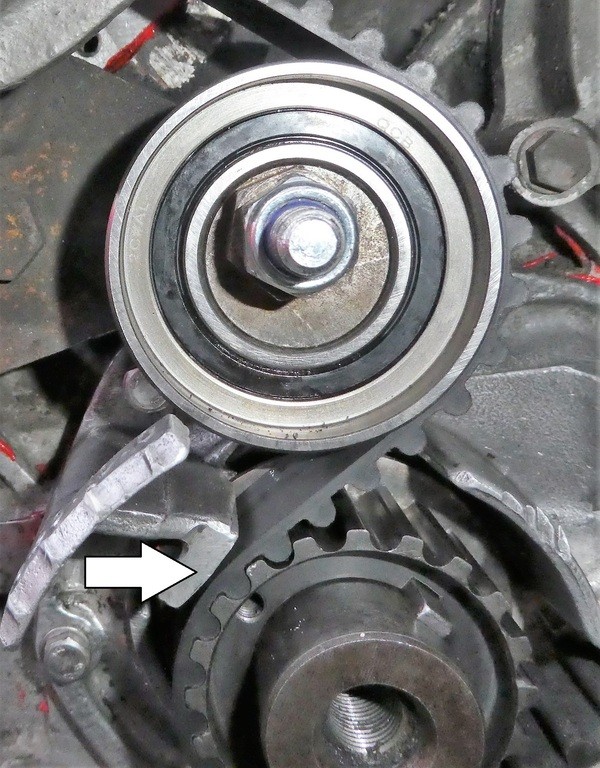
The front crank oil seal is now fitted and engine running. No sign of an oil leak - yet.
My only concern was after replacing the front housing is the belt seemed to run a little close to it. Can't remember what it was like before.
See in the picture below - the gap where the arrow is pointing is about 0.6mm between belt and housing. Is that OK? I ran the engine till the fans came on and the gap didn't change and there are no 'rubbing' marks on the belt. The writing on it is still as new so I don't think there is any contact.
Cheers, Phil
Never take life seriously, nobody gets out alive anyway!
Never take life seriously, nobody gets out alive anyway!
-
Pete Boole
- Senior Poster
- Posts: 3728
- Joined: Tue Apr 04, 2006 21:28
- Model: Elite
- Colour: Monaco White
- Year: 1974
- Location: Nottingham
Re: Front Crank Oil Seal
That will be fine Phil. Good job!
Pete
Pete
-
Tanz
- Senior Poster
- Posts: 2087
- Joined: Thu May 03, 2007 22:05
- Model: SE
- Colour: Calypso Red
- Year: 1988
- Location: Wolverhampton
Re: Front Crank Oil Seal
Thanks Pete. Now its time to look at the rear suspension that has a couple of rattles. It's never been rebuilt apart from new shocks. Also MOT is coming up next month and I had an advisory on rusty rear brake pipes last year. Headlining needs doing - I have the material and glue. Then there is a problem with the Elan M100. How do people have time to run multiple classics?
Cheers, Phil
Never take life seriously, nobody gets out alive anyway!
Never take life seriously, nobody gets out alive anyway!
-
MetBlue

- Senior Poster
- Posts: 1436
- Joined: Sat Mar 24, 2018 21:00
- Model: Elite 74 & Excel 92 (SEish))
- Colour: Metalic Blue
- Year: 1974
- Location: Northampton
Re: Front Crank Oil Seal
Be interested on your work and progress on the rear suspension.
I'll be going there next (once I get the pedal box, dash and front suspension rebuilt.
Tony
I'll be going there next (once I get the pedal box, dash and front suspension rebuilt.
Tony
What goes together.... Must come apart.