Bl**dy Body Cracks

Body parts, seats, dash, headlining, windows and stuff!

Moderator: Board Moderators

Pjr
Senior Poster
Posts: 250
Joined: Sat May 31, 2014 17:28
Model: Excel SE
Colour: Red
Year: 1985
Location: The South West

Re: Bl**dy Body Cracks

Post by Pjr »

Image

Image

Image

Work so far this evening. Cracks tapered a bit and then paint removed from surrounding areas so that I can bond on cloth across the whole area once that cracks are glassed. I'm planning to strip a bit more around the edges, but you get the idea.

I made the mistake of buying normal chopped strand matting for the first all-over layer (as a base for the woven fabric) whereas epoxy really needs powder bonded csm although west system says that the emulsion bonded stuff will work to a lesser extent. So the correct csm is on the way.

Can't get the bobbins out though :evil: so I will have to carefully go round them. Given that the approach I am using would be fine for the bow of an icebreaker, I think it will be ok....

User avatar
Hawaiis0
Senior Poster
Posts: 4571
Joined: Sun Jun 30, 2013 18:39
Model: '86 SA; '89 SA '78 Elite 504
Colour: BRG; Dirty White
Year: 1986
Location: West Oxfordshire

Re: Bl**dy Body Cracks

Post by Hawaiis0 »

That's a brave man, great work. One comment I recall is be careful on how much you build up the layers as it squeezes the tank fit.
Nothing is fool proof. Fools are clever!

Pjr
Senior Poster
Posts: 250
Joined: Sat May 31, 2014 17:28
Model: Excel SE
Colour: Red
Year: 1985
Location: The South West

Re: Bl**dy Body Cracks

Post by Pjr »

Thanks - top tip. Looking back I think the recommendation is that it should be no more than 2 layers on the high bits. What I can't work out is how many layers I actually need! I'm thinking 3 - 4 layers of alternating mat/weave over the repaired areas except on the high bits under the tank. I guess 2 layers are the max there (or i could do 4 and grind them back a bit after!).

I can't say I feel as apprehensive as I was expecting. Dremmel drum sanders are great on the cracks and the rest is easy to sand with a rotary sander. I putting all my faith in the materials. I've been reading a lot about epoxy vs polyester resin and epoxy seems to be great for adhesion and strength, but is expensive an vulnerable to uv light. For this job, I think that's all ok.

majcd213
Senior Poster
Posts: 681
Joined: Mon May 12, 2014 07:15
Model: Excel
Colour: Grey
Year: 1983
Location: Guildford Surrey

Re: Bl**dy Body Cracks

Post by majcd213 »

Hi all- When you say woven matting you mean the Bid or bidirectional? The chopped stuff being the ordinary matting sold most places??

Looking forward to the report form the "body-on" approach
Mike
When you have eliminated the impossible whatever remains, no matter how impropable, must be hit with a hammer

User avatar
fueltheburn
Senior Poster
Posts: 1903
Joined: Fri May 25, 2012 23:04
Model: SE
Colour: Suzuki Yellow
Year: 1987
Location: Ellon, Aberdeenshire

Re: Bl**dy Body Cracks

Post by fueltheburn »

have you considered using a mix of different types of matting as the base material?
Kevlar and carbon fibre material is bonded using epoxy. Might be beneficial in this case as they have 2 different properties and when combined create a stronger material.
http://www.easycomposites.co.uk/

Just a thought....

Pjr
Senior Poster
Posts: 250
Joined: Sat May 31, 2014 17:28
Model: Excel SE
Colour: Red
Year: 1985
Location: The South West

Re: Bl**dy Body Cracks

Post by Pjr »

here is the stuff I am using

This for the cracks

Image

This for the first all-over layer which is said to bond best with the old surface

Image

Then this, which is not strictly bidirectional but similar. Apparently it has great strength when sandwiched between the csm.

Image

I did consider carbon fibre after seeing the Dowty propeller display at the Cheltenham Science Festival. However, it is expensive, is harder to wetout with resin and can be brittle. This area obviously flexes a bit and I wonder if carbon would be too stiff and so break away. Kevlar is more flexible, but I think is also difficult to handle in terms of saturating. I was also more worried of being scammed if buying either if these on ebay!

I came to the conclusion that glass was the easiest way to get it fixed and quite cheap if I mess it up. I think the resin is probably the key decision. It seems that epoxy is expensive but bonds ironically as well as mechanically so is supposedly a lot stronger than poly resin. These fabrics are mid weight - I'm wondering if I should have gone lighter weight but more layers as my wife advised.... In reality, I think my solution is over engineered, and the bigger issue will be user error!

And this is tonight's sanding:

Image

explore_australia
Junior Poster
Posts: 58
Joined: Sat Aug 02, 2014 14:03
Model: Lotus Excel SE
Colour: Essex Blue
Year: 1986
Location: Bathurst, Australia

Re: Bl**dy Body Cracks

Post by explore_australia »

The better fibreglass tape to use is Biaxial tape, it has it strands at 45deg and 45deg, when it is under tension if oriented correctly it will provide 100% more load carrying capacity. (I would provide a photo but I am new to the group and do not see how.)
Woven tape shears itself when under tension because the 90 deg fibres cut the 0 deg fibres when pulled, Biaxial is not woven, it is sown together with cotton thread, so it does not self destruct.

The red car boot photos looks like shearing damage or possibly compression damage (something shunted from underneath the car?)

I have the same cracks in the boot at the wheel arches as the original posting does .
Before doing the job I will spend some time to analyse what caused them.
Lotus may have designed and build the butt joints weak so the fuel tank is not torn apart by the body distortions when having an accident and the different expansion coefficent of the plastic body and the metal fuel tank.

Also when doing curved fibreglass work cover the job with "peelply " (your fibre glass supplier will have it), it will keep the resin close to the surface and keep the finish tidy.
All you do with peelply is push it into the final layer of wet resin, yes it is supost to get nice and wet, then when the resin is FULLY SET , peel it off you job and you will have almost no finishing to do.
Peelply is a very finely soft woven polyester cloth that follows compound curves very well, so it neatly holds the job together.
Please remember, the more resin you use the weaker you make the joint. It is the fibreglass that provides the strenght, the peelply will help you reduce the amount of resin you use.
The better way is to use vacuum impregnation but that is another topic.

Regards John

Pjr
Senior Poster
Posts: 250
Joined: Sat May 31, 2014 17:28
Model: Excel SE
Colour: Red
Year: 1985
Location: The South West

Re: Bl**dy Body Cracks

Post by Pjr »

Hi john,

The biaxial cloth does sound ideal. I did consider it, but in the end went for the csm/woven/csm sandwich concept which I'm told should give good adhesion to what's there and plenty of strength.

Re the cracks, mine looked like the blue car until I opened them out, and I think they were bad because POs had just painted resin over the visible areas. So over 31 years the fibreglass has no doubt flexed and twisted with the rear crossmember. Yours may look similar after a bit of action with the Dremmel......but hopefully not.

I agree with the consensus that the chassis bolts are probably what starts at least some of the cracks. However, I have one crack that doesn't radiate from the bolt holes so I would say that the bolt holes cause radial cracks which then allow the boot area to bounce more, causing more cracking. I had my bumper off recently and have been under all of the boot area and there are no signs of any impact damage. The crack appear to be a result of flexing. The glass isn't that thick in the area I have sanded and the spare wheel, battery, exhausts, tool kit etc weigh quite a lot and I expect the boot floor bounces around a fair bit on these early cars without the bracing.

In terms of protecting the tank, I think the main protection comes from the crossmember below and the suspension turrets either side. The tank need not actually sit on the gro (it has squishy insulation under it) as it is suspended from the turrets either side (which are reinforced with metal plates). Either side of the spare wheel appear to be reinforcements and the cracks are pretty much where these areas (which carry the bouncing forces of the spare wheel, tools, battery) join the saddle section that goes over the crossmember.

My last observation is that as far as I can see Lotus used chopped strand matting (not that thick) in the area and I think the resin used was polyester. I'm afraid there is no science in any of the above, just a bit of guesswork!

Pjr
Senior Poster
Posts: 250
Joined: Sat May 31, 2014 17:28
Model: Excel SE
Colour: Red
Year: 1985
Location: The South West

Re: Bl**dy Body Cracks

Post by Pjr »

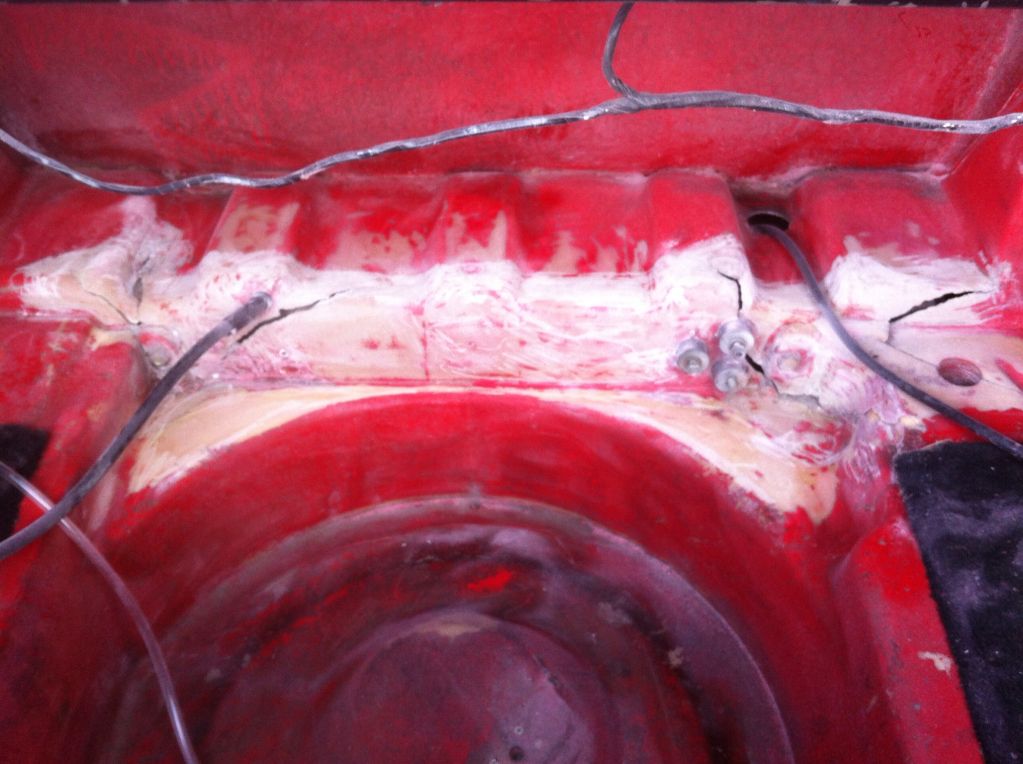
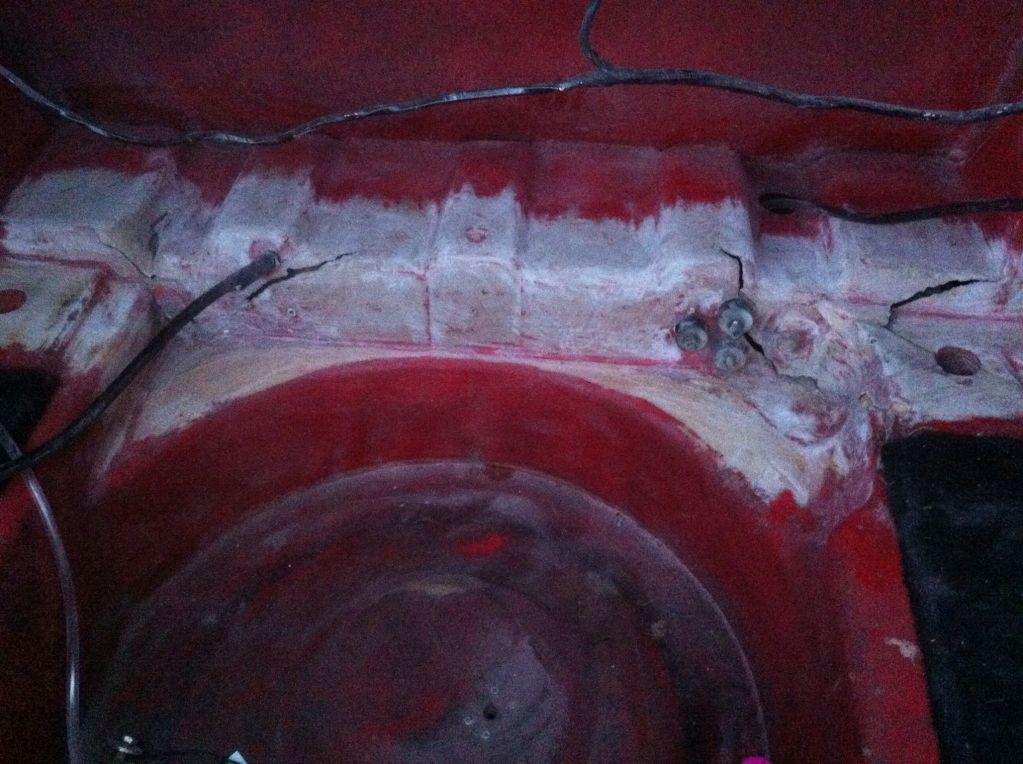
Some of the initial glassing of the cracks to bring them level with the surrounding areas. 2 or 3 layers of tape with final layer at 45 degrees to add strength. Left overnight to cure:

Image

Image

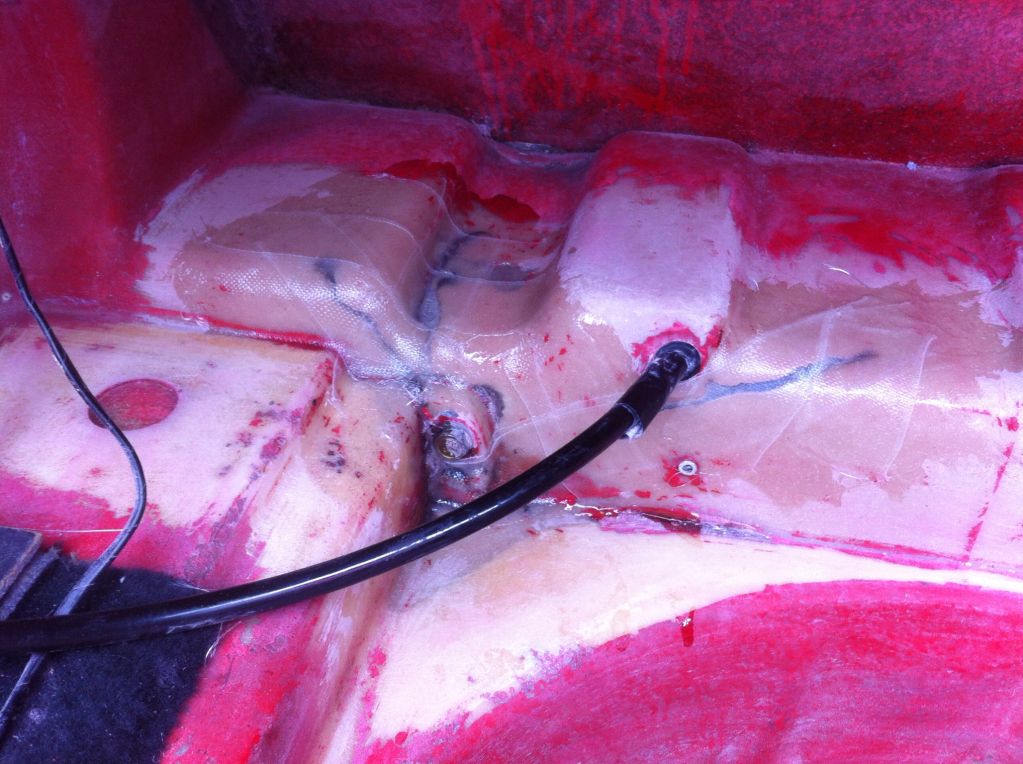
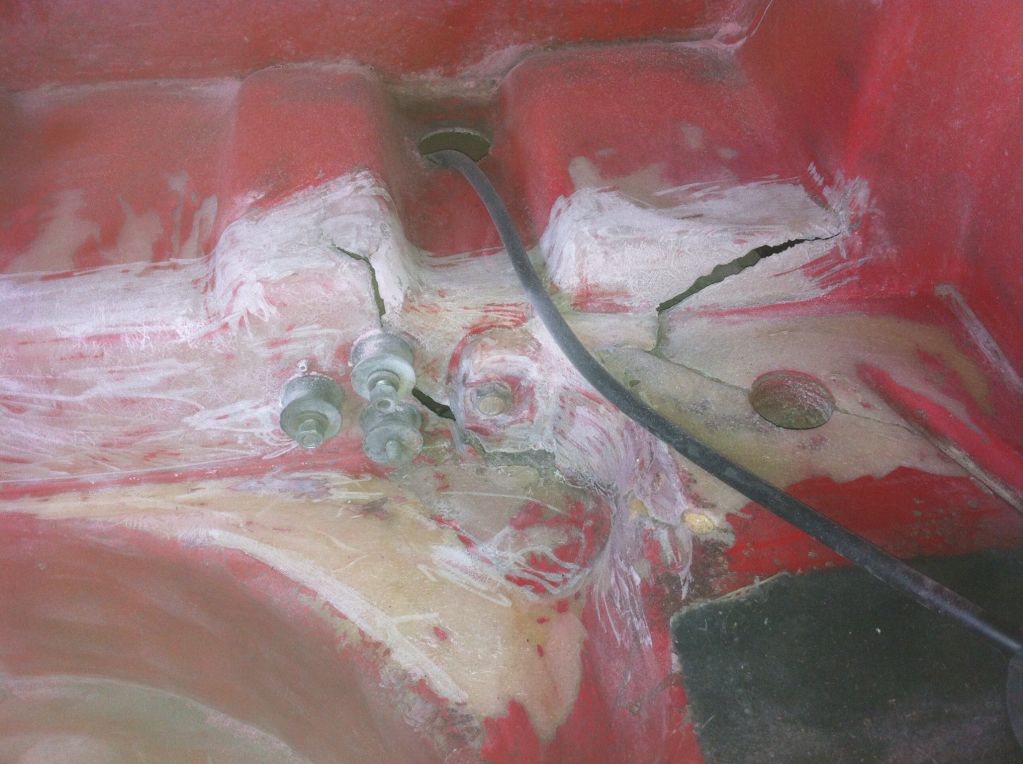
And then today I lightly sanded and cleaned with acetone before putting on a layer of csm (nightmare) and then the woven roving (lovely stuff). This is as I was wetting out the woven roving:

Image

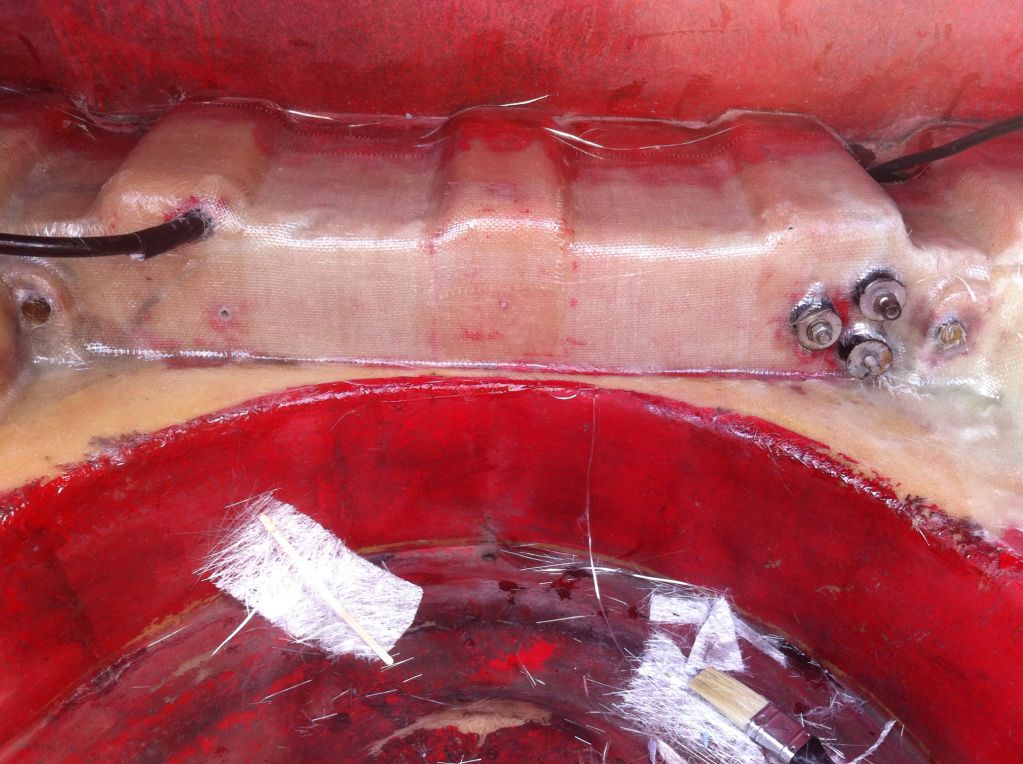
I reinforced areas over the cracks with a second layer of woven roving and then went round chasing out any air bubbles, wrinkles etc. when it was curing, I started to trim back bits around holes, bolts etc. woven is 100 times easier than the csm!

The tank went back in with lots of room to spare, so I could have put in another layer or two, but frankly 2 layers over the tape reinforced cracks seems pretty strong. The car is reassembled, but I'm not taking the support from under the boot for another 24/48 hrs depending on temperature.

Fingers crossed it will be ok!

Ps, does anyone have a spare bolt to retain the spare wheel? Or the carpeted panel that goes in front of the tank? I could make a panel, but I've used up all my creativity for a while.....

User avatar
Jason.goad
Senior Poster
Posts: 739
Joined: Thu Nov 08, 2012 00:00
Model: excel
Colour: red should be black
Year: 1985
Location: Bolton

Re: Bl**dy Body Cracks

Post by Jason.goad »

That looks like a fantastic job. Hope to get mine as neat as that. I think congratulations are in order.
Well done.

Pjr
Senior Poster
Posts: 250
Joined: Sat May 31, 2014 17:28
Model: Excel SE
Colour: Red
Year: 1985
Location: The South West

Re: Bl**dy Body Cracks

Post by Pjr »

Many thanks. But I stress that the chopped strand mat is difficult to use because as you apply the resin, the strands stick to the brush. It's easy to trap air and it doesn't conform to corners as easily as you imagine. You have to pour loads on and use the side of the brush to squish it down. The neat finish you can see is the woven material wetted out over the top of the csm. As the resin was gelling, I used a Stanley knife to ease any wrinkles/bubbles and a gloved finger to press it firmly into the difficult nooks and crannies. After the photo was taken but before the resin went off fully, I used the knife to cut out the holes for the exhaust mounting bolts.

If I did it again (and I might have to if this doesn't work) I would probably use just the tape and then the woven stuff, and just layer it on, some at 45 degrees to the rest. Or the biaxial cloth that has been suggested by other posters.

I am impatient, so I have removed the jack and plank under the boot already. Even with the battery, exhausts, tools etc back in, there was no creaking or cracking and the World kept turning. Although it is rock hard already, apparently it will cure more (last 10%) over 24/48 hrs.

Pjr
Senior Poster
Posts: 250
Joined: Sat May 31, 2014 17:28
Model: Excel SE
Colour: Red
Year: 1985
Location: The South West

Re: Bl**dy Body Cracks

Post by Pjr »

I just thought I'd report that after a few miles driven, the repair seems to be robust. I have also crawled underneath and, where possible, filled the crack on the underside with epoxy thickened with 404 high strength filler. I'm not sure it will add much strength, but I thought it might help a bit but reducing any flex in the old crack.

Long term, I may try to adapt and fit a metal boot support (non-original) to future-proof it.

User avatar
Hawaiis0
Senior Poster
Posts: 4571
Joined: Sun Jun 30, 2013 18:39
Model: '86 SA; '89 SA '78 Elite 504
Colour: BRG; Dirty White
Year: 1986
Location: West Oxfordshire

Re: Bl**dy Body Cracks

Post by Hawaiis0 »

PJR, here is a shot of my support bracket made by the PO. Basically 2 plates welded at 90 degrees with a spreader plate in the boot to bolt to.

Image
Nothing is fool proof. Fools are clever!

Pjr
Senior Poster
Posts: 250
Joined: Sat May 31, 2014 17:28
Model: Excel SE
Colour: Red
Year: 1985
Location: The South West

Re: Bl**dy Body Cracks

Post by Pjr »

Hawaiis0,

Thanks for the photo - that looks simple but effective. I may try to make one of those because it looks very solid.

The other day I had to cut up and old bath with an angle grinder and then break it into pieces. What I observed was that the grp was amazingly strong until there was a cut or crack, but then twisting/bending forces cause it to fail by cracking quite easily. The layup wasn't that thick, with half the thickness being gel coat. At first I was worried that my new grp is not thick enough, but then I reasoned that my cracks must have been from 30 years of flexing and bending, so actually now that the cracks are ground out and repaired it should be sufficient. But a bracket like this would remove the concern that I am sure I will feel if I have to put a heavy box in the boot!

Thanks,

Phil

User avatar
Jason.goad
Senior Poster
Posts: 739
Joined: Thu Nov 08, 2012 00:00
Model: excel
Colour: red should be black
Year: 1985
Location: Bolton

Re: Bl**dy Body Cracks

Post by Jason.goad »

Hello everyone.
I've finally got round to sorting the body crack on my 1985 excel. Not the best time of year for using fibreglass, but life and lack of money always gets in the way. I suspect I may have gone a little overboard, but it's really not a job I wish to do again.

Image

Only looks like a tiny little crack, but it managed to make enough noise going over bumps.

Image

Even with only a light sanding you can see the crack getting bigger, the body is very thin in this area.

Image

With the area fully sanded and cleaned, it's time to start with the glassfibre. I purchased woven Bi-direction tape for the first layer and Combination Mat for the top layer (it's a mixture of woven roving mat and chopped strand mat stitched together).

Image

Here's the Bi-direction tape:

Image

Then the Combination Mat:

Image

After a week of drying, I trimmed the excess glassfibre and sanded any rough parts:

Image
Image

A coat of black (it's natural colour) and hopefully; job done. :D

Post Reply